Sunday, August 16, 2015

A new PSU... KPO SPS-30-II ... PART 1: The good, the bad and not so bad at all

A while back I bought a KPO SPS 30-II .... And I promised to write something about it in a few weeks... well.. a few weeks became a few months....

So without any more delay..... here it is , a 59 euro 30 amps power supply......
yeah you read it right... 59 euro..... (thats dirt ass cheap for dutch standards)

It looks like this.....


Not too bad in my opinion, nice clear meters, and if you take the price into account, it's beautiful.
It feels well build as well , as only the front s plastic, the rest is all metal....
It does have this nasty warning at the top back.....


I guess this is a bit over exaggerated as the construction will not allow this to become too hot... (airflow is continues, and the components are on the bottom and not at the top)

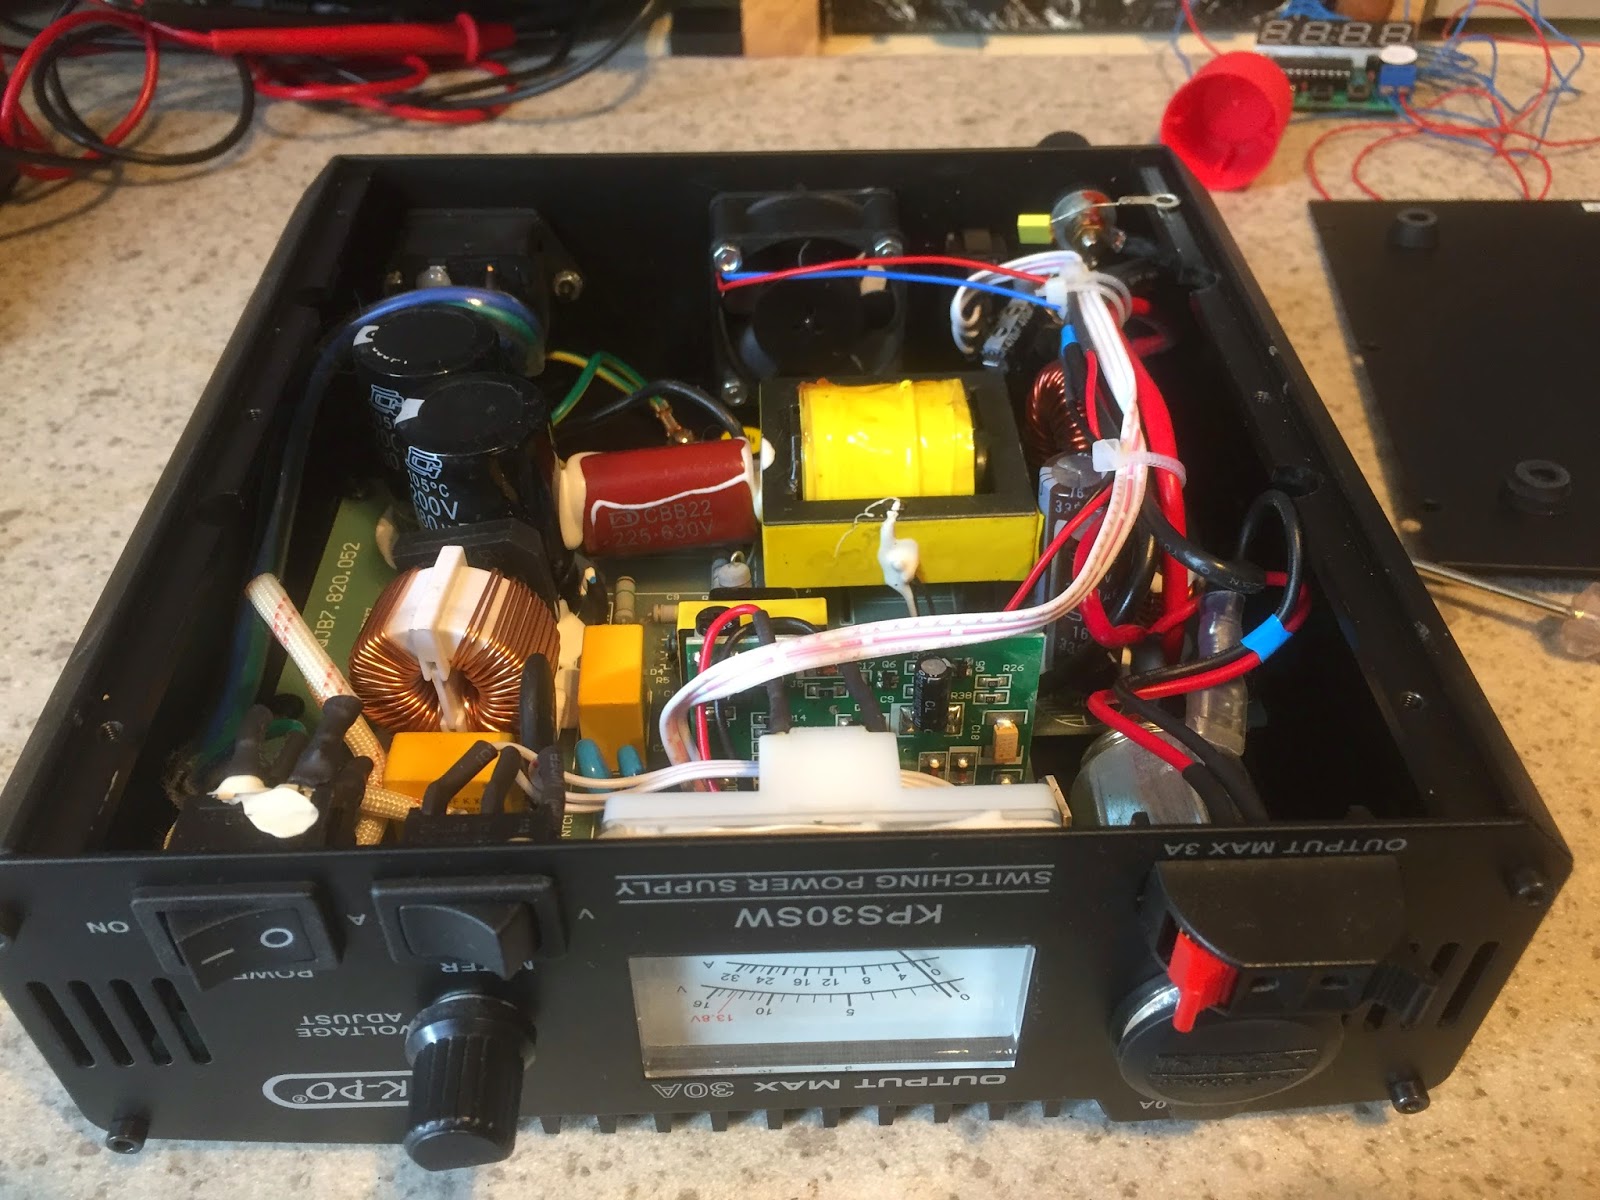
Soooooo.... Let's take a look inside....
Well yes.... not that quick though.... to get inside you need to take out  >>13<< screws.
My 1st thought was that this was a tad too much.... but no.... as soon as you have them all out you will notice that without the 13 screws, the structural integrity has completely gone... and it feels not well build at all anymore...  Not that this is a problem, i do not know any people that would take it apart, and then put it on a shelf to use it....


So now we can take a look inside....


At first glance, this PSU looks really nice... A bit like the other proper build KPO i wrote about earlier... No spilled heat paste or white glue stuff...
But after about 30 seconds i noticed a missing part..... AGAIN!!!


In the picture above, again, the clixon is not installed.... KPO clearly did want to put it in as the 2 holes give away their intentions.... (ohh by the way, the heat past you see in this pic, is the only you will find in this unit)
I do not know why they will not just add this.... the PSU is 59 euro, add the stupid thing and make it 64,95... still cheap...

So how does it perform... As I did not have time to have it run at high current for a while, I measured the DC voltage with no load (just 2 small vhf/uhf transceivers powered on) and 1 measurement with a load of around 8 amps....


As you can see , with 8 amps , the PSU drops 0.06 volts..... I think that this will do perfectly for all my VHF/UHF sets.... (I will measure some higher currents on all my PSU's in the near future)


Part 2 , adding the missing part will come soon :)

73's

Alex
PA1SBM


Saturday, August 15, 2015

The FoxDelta.com 1-50 MHz swr analyzer.........

A while back I was browsing the internet..... I always wanted a SWR analyser, but i always thought that the price was a bit high for a tool I only use like 5 times a year....
 So somehow I got to a site.... foxdelta.com ...... And I found this..... aaz-0914a
..... 50 bucks...... After like thinking about it for about a month, I ordered it....

Then after a few weeks....... No i have to be honest.... it was more like just over a week from the US/India to the Netherlands... nice and fast....


WOOHOOO!!! its here...... but then... ohh crap... real life.....

So after a month... I started to unpack it.... holly crap this is nice......


Every thing in zip-lock bags, even the PCB... and the PCB looks sweet as well.....
And oh crap again... real life.... Again a month later....
Finally some free time.... lets go !!!


And after about an hour or two we got a working project.....

Well, in this picture it was not working to be honest.... I kinda screwed up a C on the PCB... soldered it on the wrong spot... so no input signal came to the controller.
So this is when it was really done :)


And, as there is no OSX or Linux software yet to my knowledge (I will check up on this later), I had to steal my girlfriends windows 10 laptop.... she never noticed :).....

And then you get nice graphs.... like this.....


Now this is from my 10m antenna, which I thought to dip a little later in the band.... more around 28.450 MHz.... and I thought the SWR would be a little lower, but I never actually measured this at all.... So now I need a propper SWR meter.... guess I need to borrow one :)
If the analyzer is way off, I will post again , but I think it is not that far off to be honest...


73's
till later!!

Alex
PA1SBM


Wednesday, April 22, 2015

New toy's !! Arduino's for HAM projects.

Hi all....

Today the mail arrived with a new toy....
I ordered an Arduino UNO and a Nano....

I did not have time to do a lot of things with it, but I uploaded a quick program to it.... just watch the orange led blinking SOS in morse....


This is also where I want to use the Arduino's for.... morse stuff... Still looking into fun projects for them....

Ohh and on eBay the imitation ones are really cheap.... if you guy's know of fun morse projects, just leave something in the comments..

73's
Alex
PA1SBM

Friday, March 20, 2015

BITX20 - 24. PA part 2... the story continues....

Well, it has been a long while since the 2 criteria to work on the bitx20 both were valid....
A) I have to feel like it....
B) I need time...

But as i have the week off.... i picked up the project box where the Bitx20 is in and opened it up.....
I took out the PA and started to look what was needed.....

I left off here.....


So i grabbed the manual and started to work with the dreaded coils i had to make......
Fortunately I did not have to make trifilar's, just bifilar and singles, which is a lot better.

So after a bit the board looked like this.......

According to the manual you are done at this point.... but i already stated that  the manual is a bit quirky and not 100% correct due to Indian>English>"Dutch understanding" translations.
If you look closely you will see that a 220pF capacitor, 0.55uH coil and a 1N4001 are missing...
Also a 100pF, but you cant see that due to the heat sink being in front of it.
On the top part you see some missing components as well, but that is only if you wanna use a higher voltage on the PA (or actually on the IRF510) then the standard 12 volts. As I intend to use this with standard 12v (or actually 13.8), I choose the other build method described in the manual. few less components.. (diode's resistors and an lm317)

Now getting back to the non explained missing components.........
This is a mod that was allready added to the PCB and also to the parts.... but not so good in the build manual....
In the mod section you find something , but not how to make this L2....
this is the mod:  Bitx20 Linear AMP mod
As it was still not clear what and how to do with L2 (found out later that it was named L2) i downloaded the build manuals of the Bitx20 ver 3b/c.
In there i found exactly what was needed....... 14 turns on a T50-6.
The diode is used in the version 3b/c as well , so i put it in and i have no idea if i should or not.....
I still need to do some testing and do the measuring to see if all is ok....
At least the PA/PSU looks finished now :)


Onto the next part !!! This will be a rebuild of the VFO from test version to something a bit more neat (Has to be done as well as 1 of my cats decide to chew on all the wires.... grrr)  and i will put the VFO and Counter in HF tin enclosures (or whatever they are called in proper English :) .....
Something like this :)


We're getting near something that will actually work!
Untill the next time!

73's
Alex
PA1SBM

Monday, March 16, 2015

K-PO KPS30SW : Part 2 - adding a bi-metal thermal thingie.....

Hello all.....

About the title... As no-one posted a comment about what the proper name was of the temprature sensor, I still call it a "thingie"........

So yesterday i visited my good friend Hans (PD0AC). If you don't know him, you really should look at his blog as well <link>.

We started to talk about my PSU story and I told him about the bi-metal thermal thingie "missing" in one of them..... and he told me that he had "a few" laying around his shack.... (a few seems to mean between 20 and 30) so he gave me one of 60 degrees Celsius... meaning that it will close (make connection) if the temperature exceeds 60c we started to discus the temperature and we came to this conclusion...
  • lower has no use, because it will turn on too often in the warmer summer days
  • lower has no need as the power FET's will be ok till about 120c
  • higher is not needed as 60c is hot enough...
So today i put it in......

Opening this PSU is easy, flip it over and remove 6 screws....


And then you are left with this......


When you take a closer look at the back near the fan, you will see that K-PO has been nice enough to actually leave some taped holes where you can place the bi-metal thermal thingie without a problem..


So after bending the leads a bit for easier soldering , and adding some Thermal paste, i placed it where it should be....


Just a little tip..... the bolts i used were used to mount a floppy disk drive in the good old days...


Now in my opinion this all smells a bit like K-PO trying to reduce manufacturing costs... and let's be honest, i rather have them cut cost in a thermal switch thingy then something significant that can blow up your PSU.... But still, it's nice to have less fan noise in your shack.... 

And again, this in no way a bad PSU. You won't get more bang for your bucks as with K-PO PSU's
And after using them for about 5 years now, i do not believe they will fail anymore due to bad construction or design.


sneak preview: i also bought myself a K-PO SPS30II (which was 59 euro new!), more about that one in a few weeks.... 


73's
Alex
PA1SBM

Sunday, March 8, 2015

CQRLOG 1.9.0 released

On the 4th of March, Petr OK2CQR, released a brand new version of CQRLOG.....

So, what's new, and what bugs were fixed.....
In the download section of www.cqrlog.com we read the following......

Version 1.9.0
  • added support for setting the QTH Nickname in eQSL.cc download dialog (Florian, DF2ET)
  • configuration can be stored into database or local computer only (Preferences -> Program -> Configure storage settings)
  • second directory path to auto backup added
  • Ignore changes caused by LoTW/eQSL upload or download option added
  • CQ and ITU zones are taken from previous QSO if exists
  • added new band map filter
  • CALLSIGN, BAND, MODE, FREQ macros to dxcluster allert command added
  • "Capitalise first letter in QTH field" option added
  • Propagation window improved, now shows more information (Saku, OH1KH)
  • after change of callsign, report, date or time, the QSO was still marked as uploaded to LotW/eQSL - fixed
  • LoTW upload - when Export all QSO was selected, only 500 QSO were exported - fixed
  • buttons caption in CW type window didn't use values from settings
  • online log upload of edited QSO fixed
  • uploading QSO to HamQTH fixed
  • downloading data for web dx cluster fixed

The 2nd new feature, to store your settings in the database is for a single user, in my humble oppinion, the best thing ever.... now you just have to backup your database which contains everything....

I run Linuxmint 17.1, and I installed it in the usual way for me....
Download the new version, and in a shell i run sudo dpkg -i cqrlog_1.9.0-1_amd64.deb
This installed without any problems....
Also running CQRLOG was without any problems... all works as expected so far.....

Again a big thanks to Petr for making this program....

73's
Alex
PA1SBM

Monday, February 16, 2015

PACC 2015... Looking back at 24 hrs of fun....

Hello all,

After 24 Hrs of HAM fun, it's time to evaluate......

Just be for the PACC.... RED ALERT!! PRIORITY ONE INCIDENT......

For the people who know me, it's not unknown that i drink a lot of coffee, and i love a good cup....
There for i have an Illy X7..... and just before the PACC the Illy broke down!! PACC without coffee is just not done..... It kinda works still, so i am gonna try to fix it, but to be sure i bought myself an new Illy X7.1

 The left picture is the old X7 , the right picture is the new X7.1


Preparing for the PACC  the last day be for......
As i always had a problem with 80m and making contacts there... i thought it would be a good idea to set up my full size ZS6BKW... 2 times 14.6 meters wide..... And as i live in a small house, i would need some extra space.....
It is unfortunately not really clear but it runs from the tree to the bottom of the highest antenna.....
This was a good choice to be honest... booming signals on 20, 40 and 80 for Europe.....


So, shack ready and almost time to begin......


The first day i was joined by 1 of the 2 cats we have and she stayed till i was going for a few hours of sleep....


So how did the PACC go for me....

When it started, i made the choice to go look around on 20m, which might not have been the best choice.... It probably would have been better to start snooping around on 10m to get some more multipliers there..... but i started out on 20 so be it... When 20m started to die out a bit i went to 40 and later to 80m.... Unfortunately i ran into a problem i noticed too late.... my headset decided to not like 80m and started to interfere when transmitting... the compressor and ALC went crazy.... No problem with the normal mic though...
That is for sure something i need to look into.... When i found out i really needed a few hours of sleep, and at 7:00CET i was back in the shack again.... After i looked a bit on 10 and 20m, I spent a lot of time on 15 and 40 meters which was very nice 40m was jam packed with dutch people, it was crazy!
15meters was really nice too.... i usually never come there , but after this weekend i am going to check it out more often....

I wanted to do better then last year... and i did, but not by very much :)
Last year results were: 194 QSO's , 11020 points....
These are the scores i logged this weekend.... probably i will loose a few QSO's, but still it should be just over last year....


ON TO NEXT YEAR!!!! Hope to work you all in next years contest....

73's
Alex
PA1SBM